Home

Georgiou TimeSheet Entry ™
Introduction
The following document outlines the site time sheet entry screen (Daily Workplace Report entry), its fields and use.
|
|
Introduction
The Time Sheet Entry (NVT_004) screen has been developed to accept the extended time sheet format as represented by the Georgiou "Daily Workplace Report".
An example of the "Daily Workplace timesheet" is shown at this link.
The basis of the design of the timesheet entry form is as follows:
- Each site manager / supervisor is responsible for 1 or more jobs / projects.
- Each job may use any combination of Georgiou employee, sub-contractors, Georgiou plant and/or Hire plant.
- Any one employee generally only works on one job on any given day.
- Any piece of equipment (Georgiou or Hire) only works on one job on any given day.
- Each site manager is then responsible for completing the timesheets on a per day basis for :
- the employees / sub-contractors working on the job / project
- the plant allocated to the job / project
Therefore the presentation and use of the timesheet entry form is as follows:
- Each tab of the entry form is to be used for the entry of the category of data shown (eg employee, equipment)
- Using the employee tab as an example. The tab shows all of the employees that normally work on this job / project. This is to serve as a visual cue for the supervisor to remind the supervisor all of the employees that generally have timesheets completed. If on any given day an employee has not worked (for reasons other than sick or annual leave), then you do not remove the employee name off the display, you simply do not complete a timesheet entry for that employee.
- The same holds true for all of the details on each of the other tabs.
- ONLY entries which have a start and finish time are considered as timesheet entries. All other entries on the screen are ignored when the user presses the "save" button. DO NOT remove anything off the screen if you do not make a timesheet entry for it, it serves as a visual cue to remind the user that a timesheet is normally due.
- To create a valid timesheet entry for a given day, you MUST select a job code and date before starting to enter any timesheet data, otherwise you will lose any information entered if you do this in reverse. That is, do not enter timesheet data, and then chose the job and / or date to which you wish to save the information.
Opening the Timesheet form for the first time
When you open the timesheet entry for the first time each tab of the screen will list all of the related information in the system. That is, it will show you all of the emloyees, all of the sub-contractors and equipment available. This is because the system has no preferences set for your login id, and as there is nothing in the Georgiou systems which holds these relationships for you, until the preferences are created by the user. When you do create the employees and equipment for a site, the selection is valid only for your login id.
If you are responsible for more than 1 job / project, you will see all of the employees, sub-contractors, equipment across both jobs. (This will be enhanced in a future update to the timesheet entry forms to link employees, equipment on a per job basis). If this is an issue, you may create more than one login id to the timesheets system and create specific job lists according to the login id.
Details on creating your personal list of employees and equipment to manage are described at this link (Timesheet entry for the first time).
Starting timesheet data entry
As noted in the introduction, to start entering timesheets, select your job code and the date for which you are entering timesheets. Do not start entering timesheet data prior to making this selection as you will lose your data.
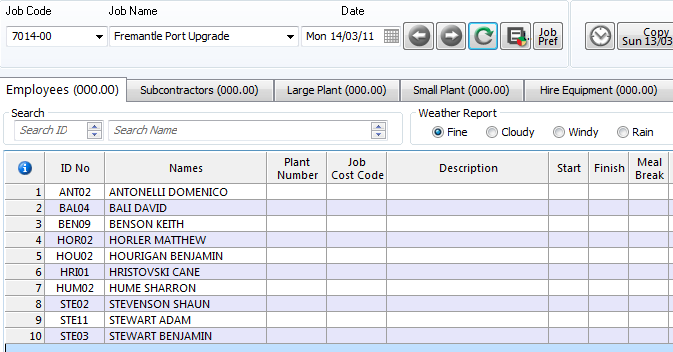
In this example, we will enter timesheets for Mon 14/03/11 as per this image.

The system will firstly check for any existing timesheets for this site and date combination. If it finds any existing timesheets it will display them on their relevant tab. If you want to force the system to check for timesheets for a particular date, you may use the refresh button (above). The system will go out and check for existing data. Note: do not use the refresh button if you have started entering timesheet data, and you have not saved your data away, as your yet unsaved data will be cleared off the screen when the redisplay comes back with the information you have requested.
You may 'save' the data on display as many times as you wish, you do not need to wait to complete 20 entries prior to saving, enter 5, save and continue for the next 5, press save, enter a further 5. The system knows that the entries are already saved and it will not duplicate entries. You may enter 5 timesheets now, and return later to finalise other entries, you are not forced to enter anything as a bulk input.
Review the below image carefully and note that the display does not show any existing timesheets. Timesheet entries are those with a start / finish value. This is showing that the 10 listed employees need their timesheets completed.
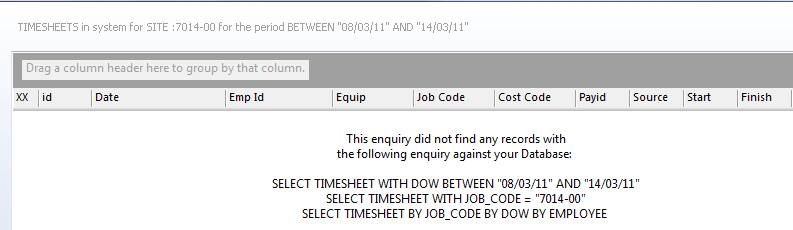
A secondary option to check what timesheets are in the system is the "Rep" button (see below icon listing), which will display all timesheets for your selected site within 7 days of the selected entry date. This can serve as a check to verify what timesheets have already been entered.
In this example, there are no existing timesheets for the period "08/03/11" and "14/03/11".
Entering Data
Once you have made your preference selections, you may then start entering timesheet information. Without elaboration on the data entry, we'll enter 2 timesheets & review the behaviour of the interface.

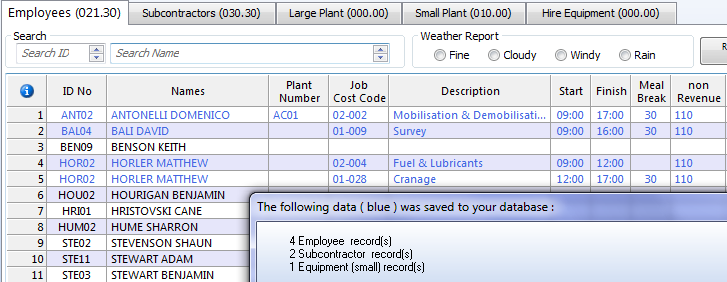
Press 'save' and the system responds with the image below. In this instance we have only entered employee data, had we entered data on other tabs we would be shown the number of records saved on the corresponding tab.
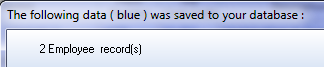
The first thing to notice about the display is that the saved data is in blue to provide you a visual cue.
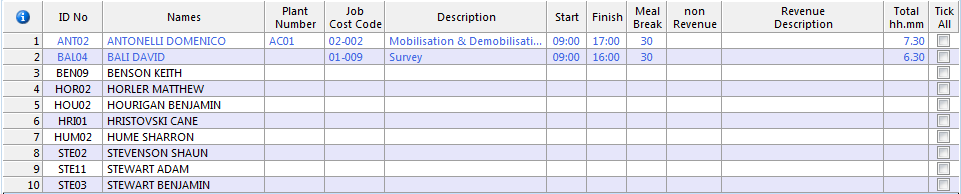
If you now run the report as indicated above, we get the data as shown below.

Entering Employee timesheets
To complete a valid timesheet entry you require as a minimum the Job Cost Code, Start and Finish time of the shift. If you do not enter a start and finish time, the row will be ignored when you press 'save' to store the data away.
- Time is accepted in 24 hour format (preferred) or you may enter 2.30pm to reflect 14.30 in 24 hour format. Enter the start and finish time of the shift (in 24 hour format). Enter the length of the meal break in minutes. The system will calculate the shift length based on this data.
- Where applicable the user is provided with a dropdown to chose options from. You may use the dropdown or enter the data free-hand to speed up processing once you become more adapt with the screen.
- The job cost code on the dropdown represents only those codes which are linked to this Job. When entering the cost code, use the drop down provided, or type the data in free hand. Tab off the field or hit Return to move to the next input field.
- If you need to split an employee's day into two or more parts, press the "Insert" key on the keyboard, and you will be presented with a duplicate line above where you pressed the insert key for the same employee.
- You would then enter the times for the first portion of the day
- And change the times of the 2nd part of the day.
- If as you press "Insert", the keyboard does not respond, press the "ESC" key (as the grid has gone into insert mode itself, and an insert inside an insert will not function), and then press "Insert"
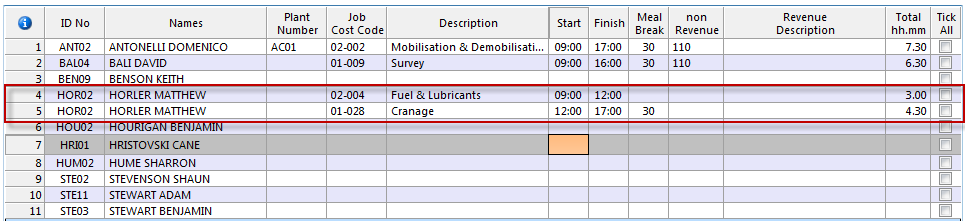
and when you save the data, the new message indicates 4 entries saved. It simply overwrites the original 2 (in case you made changes)
Note that the break time was entered into the 2nd part of the day, it could as easily have been entered into the first, or even to have had the 2nd shift start at 12.30. The total hours for the employee will be the same in all 3 scenarios.

Timesheet Entry - icons used
This grid details the icons and actions behind the buttons on this timesheet entry screen.
| Column Id |
Type |
Description & Use |
| Job Code |
Drop down (fixed) |
Select the job code that you're entering data for |
| Job Name |
Display only |
Displays the description of the job code |
| Date |
Drop down |
Enter the date for which you are entering this time sheet |
| Plant Number |
Drop down |
(If required), enter the plant / equipment that the employee worked on during the shift |
| Cost Code |
Drop down |
Enter the cost code associated with the employee's hours |
| Cost Description |
Display only |
Displays the description of the cost code |
| Start |
Drop down / data entry |
Enter the shift start time (preferrably in 24 hour format) |
| Finish |
Drop down / data entry |
Enter the shift start time (has to be in 24 hour format) |
| Meal Break |
Data entry |
Enter the lenght of the meal break in minutes (30 for 1/2 hour) |
| Pay Code |
Drop down |
Select the pay code for the shift (if required) |
| Pay Code Description |
Display only |
Displays the description of the pay code |
| Tick All |
Check |
Check off lines you wish to clear of data |
| Total hours |
Display only |
The lenght of the shift, taking into consideration the meal break |
Subcontractors Tab
The difference between an employee and a sub-contractor relates to how they are handled for payroll. A sub-contractor in Georgiou terms represents a sub-contracing organisation rather than an individual employee of that organisation. Therefore, the additional entry required to enter sub-contractor hours is to note the number of staff that worked on site.
The image below should be self-explanatory of how entering a value for the number of employees multiplies the total hours worked for the day. The example below demonstrates the system feedback when you press "save". The system has saved 2 sub-contractor timesheets and the original 4 employee timesheets.
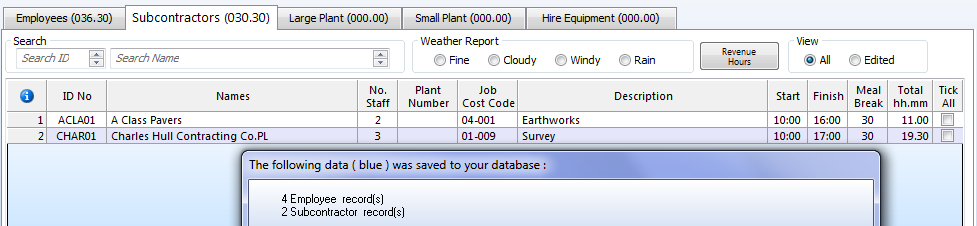
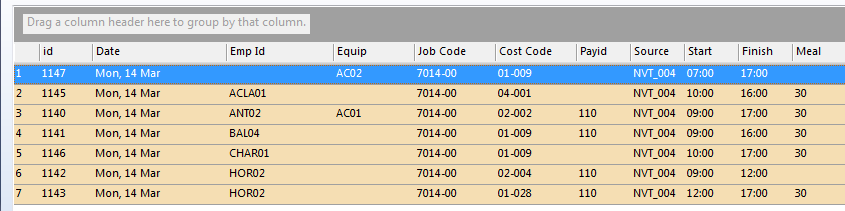
If you run the report, you will now see the 6 timesheet records for the day. You will note that there is no Payid against the two sub-contractor entries.

Top of Page
Equipment Tab
The equipment tabs represent a categorisation of Georgiou plant based on size, and externally hired equipment.

Data entry is exactly as for employees and sub-contractors, as per the following
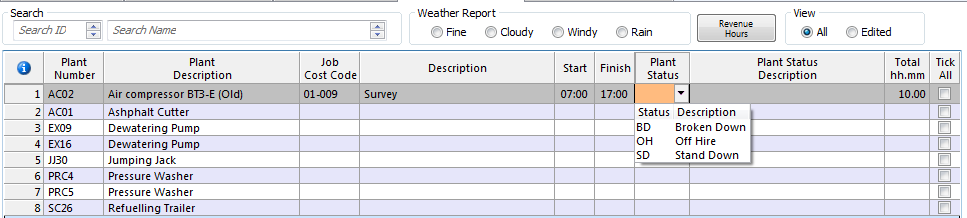
Saving the data, and running a report shows that there is no employee involved with the entry, and there is obviosuly no meal break accompanying.
Speeding up Data Entry
By and large you would expect that timesheets will routinely be very similar if not exactly the same as they were yesterday, perhaps last week, or at least some variation with a few tweaks.
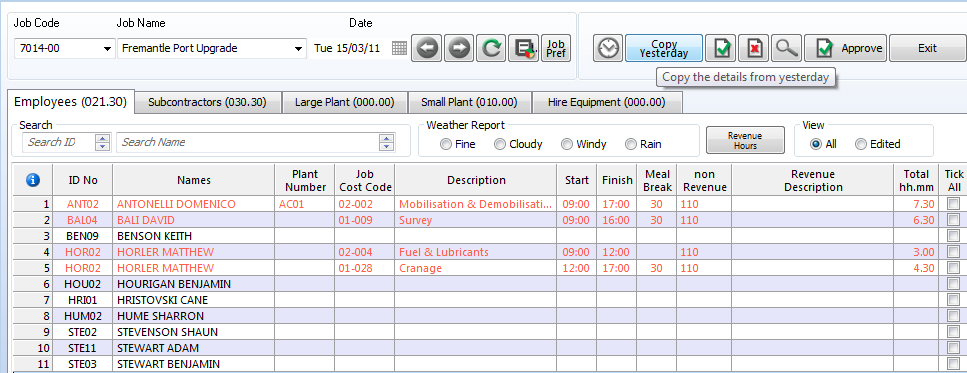
The first option is to copy the timesheets from "yesterday", so we will move the date forward one day, and "copy yesterday" as per the following. You can see the visual cue in red, and if you were to run a quick report you will find that these shifts (today) are not on the display. They are not on the display because you have not saved them.
If today's timesheets are exactly like yesterday, you need only press the save button and you have all of your timesheets completed.
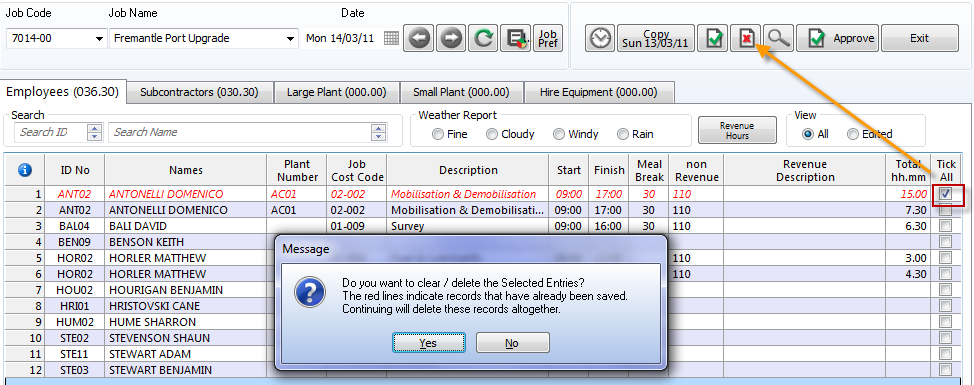
If there is a line that you do not wish to include in todays' timesheets, simply use the following example of how to remove it from the display. Or, you may chose to clear the shifts start and finish times, and then the system will not look to save it away. When you copy time data from a previous day, you will at some occassion copy more shifts than are required for the day. Therefore you must clear the unwanted shifts, before you save your timesheet. The way to clear data that you've copied or entered by mistake is to use the checkbox and process as described in the following paragraph "deleting copied data". All that you need to do is to 'check' the line which you want cleared, and then press the red "X". You follow the same process if you wish to remove an entry which is already saved away - the system works out that the record has been saved away and removes it permanently from the timesheets.
Note: that you cannot remove or change annual leave shifts or shifts which have already been exported into payroll.
Then press save to file the timesheets away. Remember that you can come back to these timesheets any make as many changes as you need and re-save the records back, giving the following:
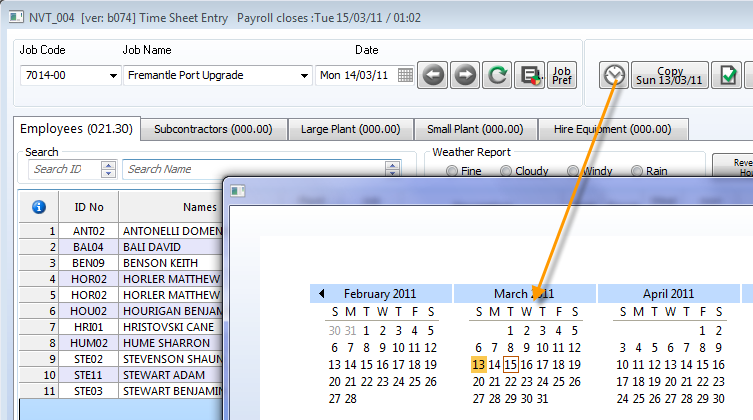
The alternate copy option is to copy the timesheets from a prior date. To copy from a prior date, follow these steps, selecting and double-clicking the date from which you wish to copy timesheets. Use the report to search out the date from which you wish to copy data if not sure.
Deleting saved copied data
You may on occassion, save the copied data or newly entered data and then realise that it was a mistake. To remove data which you've saved, follow the same process as for clearing copied data (or any data on the time sheet screen), and press the "X" to clear or delete the data. (note that these 2 images are not from this working example).
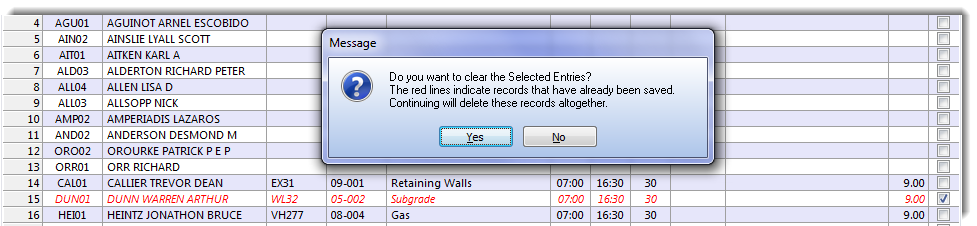
In the case of where you actually want to delete saved data, you will be prompted to confirm that you actually wish to delete these entries (as per below).
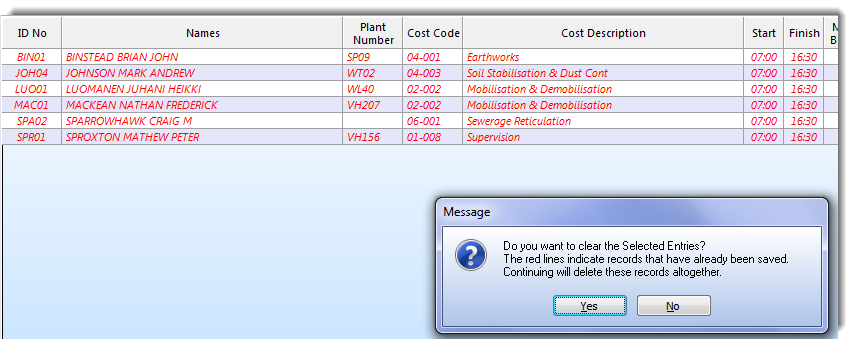
Once you confirm the delete, the screen will redraw and you may then continue with your data input.
If you have too many items on your screen, and you want to see just those employees with timesheet data, then select the "Edited" radio button in the view options.
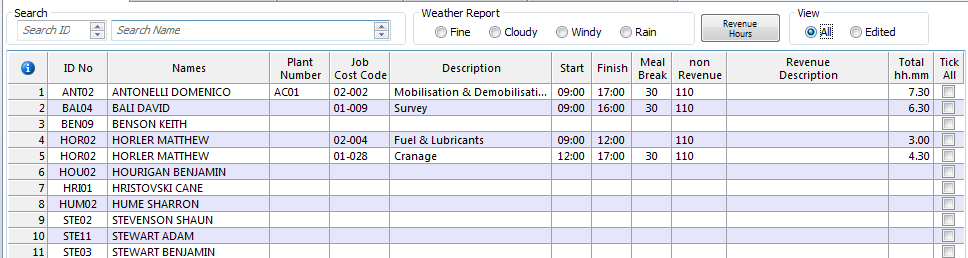
turns into this when 'Edited" is selected:

Press "All" to revert the image.
Quick Search for Employee
The design of this screen has been to show only the information that is relevant to the job being worked on, and hence the various preferences that you may set.
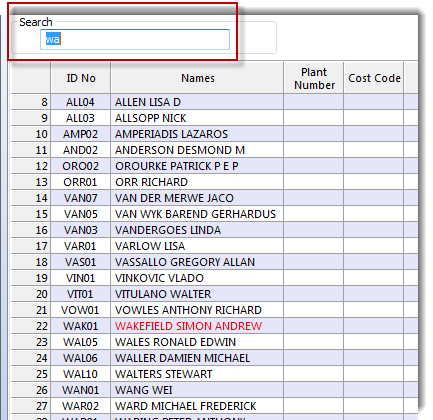
The screen is large enough to show 25-27 items per page, therefore if you have a list of 50 employees that you're responsible for, then you may use the slider bar to move the screen up / down, or you may use the "Search for" box to get to the employee quicker. The search works on the basis of you entering a character at a time, at which point the screen will move to that item if one exists.
That is, if you enter "Wa" and you have an employee called "Wakefield", the screen
moves to the first entry matching. If you wish to select that entry, click into the row adjoining.
Top of Page
See Also
 Accelerator keys Accelerator keys
Set User Preferences
Timesheet entry enhancements
Time Sheet (window) re-Design requirements document
Time Sheet (window) version 6
Time Sheet (Employee based Entry - nvt_001)
Export TimeSheet data
Time Sheet (window) Original Design
Time Sheet Testing (06/12/10)
Top of Page

Article updated by PowerForce Software on Thursday, January 27, 2011.
Copyright ©2007-2013 Envizion Systems - All Rights Reserved - Terms of Use.
|

 Refresh
 Report
 Information
 Job Preferences
 Copy time
 Save
Save Preferences
 Delete